Functional Movement Screen (FMS)
Those measurements will be used to
set some of the test explained below.
Height of the tibial tuberosity while standing

Hand
length
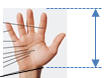
Most distal wrist crease
Examines the symmetrical movement of squatting—the left and right sides of the
body do the same movement. To pass this screen, you need optimal mobility at the
ankles, knees, hips, and shoulders, and optimal stability throughout the spine.
Classic
Instructions
•
Stand tall with your feet approximately shoulder width apart and toes pointing
forward.
• Grasp the dowel in both hands and place it horizontally on top of your head so
your shoulders and elbows are at 90 degrees.
• Press the dowel so that it is directly above your head.
• While maintaining an upright torso, and keeping your heels and the dowel in
position, descend as deep as possible.
• Hold the descended position for a count of one, then return to the starting
position.
• Do you understand the instructions?
Scoring
3
Upper torso is parallel with tibia or toward vertical | Femur below
horizontal | Knees are aligned over feet | Dowel aligned over feet
2
Upper torso is parallel with tibia or toward vertical | Femur is below
horizontal | Knees are aligned over feet | Dowel is aligned over feet | Heels
are elevated
1
Tibia and upper torso are not parallel | Femur is not below horizontal
knees are not aligned over feet | Lumbar flexion is noted
Self-Screen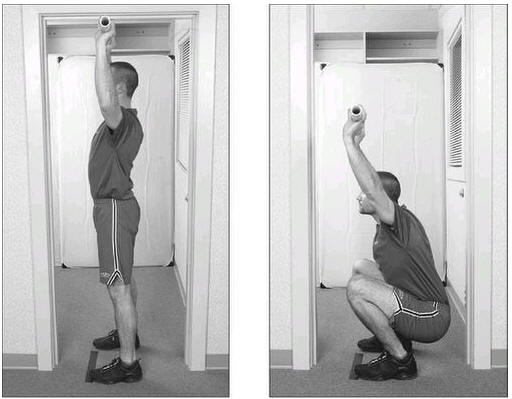
In a doorway, place a strip of tape on the floor so that the tape is your foot
length away from the doorjamb. Stand in the doorway with your feet
shoulder-width apart with half of your body on each side of the door and your
toes touching the tape. The feet should be parallel and not turned inward or
outward. Hold a dowel overhead to create a 90-degree angle of the elbows and
shoulders with the dowel. Press the dowel upward and extend the elbows to a
straight position. If you hit the top of the door with the dowel, finish
extending your elbows as you descend into the squat position.
Once you are in the proper position, descend slowly into a full squat position
as deep as you can go. Your heels should be flat and your feet should not turn
outward or slide as you descend or achieve the full depth of your squat. The
dowel should remain overhead at all times and the dowel, your face, or your head
cannot touch the doorjamb. To successfully complete the squat, heels must remain
on the floor, the head and chest must face forward, and the dowel must be
maximally pressed overhead. You have up to three chances to complete the squat,
but it is not necessary to perform the squat again if it is achieved on the
first attempt. You pass if the heels stay down, the feet do not slide or rotate,
the hips are below the knees, the knees are aligned over the feet, and the dowel
does not touch the wall. You fail if any of the five elements is not presently
possible. If the movement causes pain, no score is given. It is recommended that
a medical professional perform a thorough evaluation of the painful area.
Examines the asymmetrical movement of stepping—the left and right sides of the
body perform opposite movements. To pass this screen, you need optimal mobility
of one ankle, knee, and hip while demonstrating optimal stability and balance of
the other ankle, knee, and hip, as well as the spine. The test is performed on
the left and right sides.
Classic
Instructions
• Stand tall with your feet together and toes touching the test kit.
• Grasp the dowel with both hands and place it behind your neck and across the
shoulders.
• While maintaining an upright posture, raise the right leg and step over the
hurdle, making sure to raise the foot towards the shin and maintaining foot
alignment with the ankle, knee and hip.
• Touch the floor with the heel and return to the starting position while
maintaining foot alignment with the ankle, knee and hip.
• Do you understand these instructions?
Scoring

3 Hips, knees and ankles remain aligned in the sagittal plane |
Minimal to no movement is noted in lumbar spine | Dowel and hurdle remain
parallel
2
Alignment is lost between hips, knees and ankles | Movement is noted in
lumbar spine | Dowel and hurdle do not remain parallel
3
Contact between foot and hurdle occurs | Loss of balance is noted
Self-Screen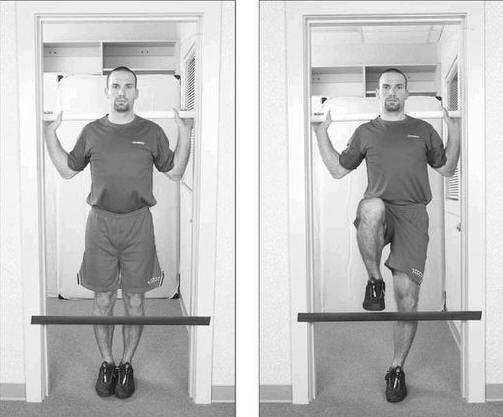
Fasten a strip of tape across a doorway to create a hurdle. The tape should be
placed on the outside of the door where you plan to stand when you perform the
test. Adjust the tape to the height of the bump on the upper shin just below the
kneecap (tibial tuberosity). Assume the starting position by placing the feet
together. Position the dowel across your shoulders, not on the neck. The dowel
should be just behind the door face as you stand erect with it across your
shoulders. Align the front edge of the toes directly beneath the tape.
Step over the tape and touch the heel to the floor while maintaining balance. Do
not put your weight on your heel. Only touch the floor lightly and return to the
starting position. Try not to touch the tape as you move the foot over and back.
The hurdle step should be performed slowly, as many as three times per foot if
needed. Perform the hurdle step on each side and give a passing grade if the
hips, knees, and ankles remain aligned forward, the dowel and hurdle remain
parallel (the dowel cannot dip to the left or the right), the dowel does not
touch the wall (this would happen if you leaned forward), and balance is
maintained. You should have no movement above the waist. The goal is not just to
clear the tape. Score yourself hard here. If you get over the tape but have to
contort your body and compensate to do so, then you have identified a problem
that should be corrected. Give a failing grade if any of the four elements is
not presently possible on either side. If the movement causes pain, no grade is
given for the test. Have a medical professional perform a thorough evaluation of
the painful area.
Examines the asymmetrical movement of lunging. To pass this screen, you need
optimal mobility, stability, and balance of both legs in the opposing positions
of hip flexion and hip extension. Lunging also requires optimal spine stability.
The test is performed on the left and right sides.
Classic
Instructions
• Place the dowel along the spine so it touches the back of your head, your
upper back and the middle of the buttocks.
• While grasping the dowel, your right hand should be against the back of your
neck, and the left hand should be against your lower back.
• Step onto the 2x6 with a flat right foot and your toe on the zero mark.
• The left heel should be placed at (tibial length) mark.
• Both toes must be pointing forward, with feet flat.
• Maintaining an upright posture so the dowel stays in contact with your head,
upper back and top of the buttocks, descend into a lunge position so the right
knee touches the 2x6 behind your left heel.
• Return to the starting position.
• Do you understand these instructions?
Scoring
3
Dowel contacts maintained | Dowel remains vertical | No torso movement
noted | Dowel and feet remain in sagittal plane | Knee touches board behind heel
of front foot

2
Dowel contacts not maintained | Dowel does not remain vertical | Movement
noted in torso | Dowel and feet do not remain in sagittal plane | Knee does not
touch behind heel of front foot
1
Loss of balance is noted
Self-Screen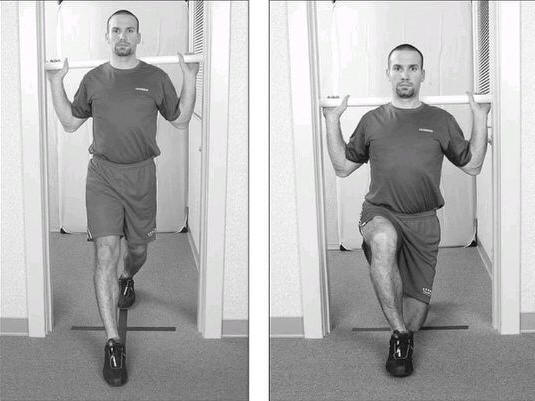
Cut a strip of tape that equals the length of the lower leg from the bump below
the kneecap to the floor, the same measurement used for the hurdle step. Place
the tape on the floor through the center of the doorway, with the doorway
marking the halfway point of the tape (half the tape on one side of the door and
half on the other side). Stand over the tape with the toes of the rear foot
touching the back end of the tape and the heel of the front foot touching the
front end of the tape. The dowel should be placed in the same position used in
the hurdle step screen.
Lower your back knee enough to touch the tape behind the front foot. The heel of
your front foot should remain flat on the floor. Your feet should be on the same
line and pointing straight throughout the movement. Perform the lunge up to
three times on each side in a slow, controlled fashion. Give a passing grade if
there is minimal to no upper-body movement, the feet remain on the tape, the
back knee touches the tape behind the heel of the front foot, the dowel does not
touch the wall, and balance is maintained (the dowel must not tip left or
right). Give a failing grade if any of the five elements is not presently
possible. If the movement causes pain, no grade is given for the test. Have a
medical professional perform a thorough evaluation of the painful area.
Instructions
• Stand tall with your feet together and arms hanging comfortably.
• Make a fist so your fingers are around your thumbs.
• In one motion, place the right fist over head and down your back as far as
possible while simultaneously taking your left fist up your back as far as
possible.
• Do not “creep” your hands closer after their initial placement.
• Do you understand these instructions?
Scoring

3
Fists are within one hand length

2
Fists are within one-and-a-half hand lengths

1
Fists are not within one and half hand lengths
Examines the asymmetrical movement of a straight leg raise. To pass this screen,
you need optimal mobility of the legs and optimal core stability in a supine
position (on your back). The test is performed on the left and right sides.
Classic
Instructions
• Lay flat with the back of your knees against the 2x6 with your toes pointing
up.
• Place both arms next to your body with the palms facing up.
• Pull the toes of your right foot toward your shin.
• With the right leg remaining straight and the back of your left knee
maintaining contact with the 2x6, raise your right foot as high as possible.
• Do you understand these instructions?
Scoring

3
Vertical line of the malleolus resides between mid-thigh and ASIS The
non-moving limb remains in neutral position

2
Vertical line of the malleolus resides between mid-thigh and joint line |
The non-moving limb remains in neutral position
 1
Vertical line of the malleolus resides below joint line | The non-moving
limb remains in neutral position
1
Vertical line of the malleolus resides below joint line | The non-moving
limb remains in neutral position
Self-Screen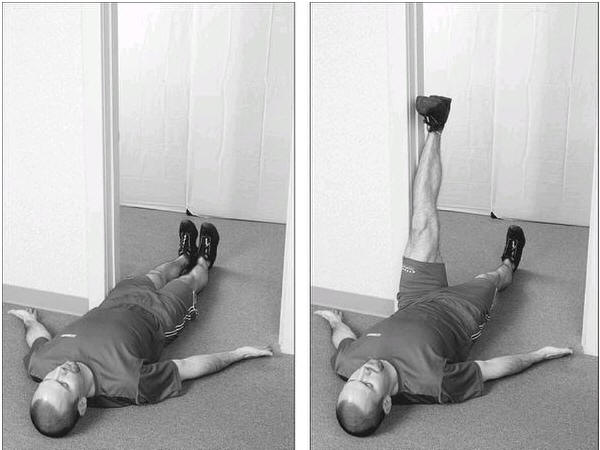
Assume the starting position by lying on your back perpendicular to (through)
the doorway with your arms at your sides, palms up, and head flat on the floor.
The midpoint between the hip and the top of the bend of the knee is in line with
the door frame.
Lift the leg that is closer to the door frame while keeping the foot flexed and
knee extended. During the test, the other leg should remain in contact with the
floor and not move. The head should remain flat on the floor, and the arms
should not move. The test may be performed as many as three times on each side.
Give a passing grade if the ankle bone (lateral malleolus) of the lifted leg
clears the doorjamb and the floor-bound leg does not move. The foot of the
floor-bound leg should point straight upward for the entire test. The knee of
the floor-bound leg should remain extended without the slightest degree of
flexion. Give a failing grade if any of these elements is not presently possible
on either side. If the movement causes pain, no grade is given for the test.
Have a medical professional perform a thorough evaluation of the painful area.
Instructions
• Lie face down with your arms extended overhead and your hands shoulder width
apart.
• Pull your thumbs down in line with the (forehead for men, chin for women).
• With your legs together, pull your toes toward the shins and lift your knees
and elbows off the ground.
• While maintaining a rigid torso, push your body as one unit into a pushup
position.
• Do you understand these instructions?
Scoring

3
Men are unable to perform a repetition with hands aligned with the chin |
Women unable with thumbs aligned with the clavicle
2
The body lifts as a unit with no lag in the spine | Men perform a
repetition with thumbs aligned with the chin | Women with thumbs aligned with
the clavicle

1
Men are unable to perform a repetition with hands aligned with the chin.
Women unable with thumbs aligned with the clavicle
Examines the ability to rotate the upper torso left and right in a seated
cross-legged position. To pass this screen, you need optimal upper-torso
mobility as well as optimal hip mobility. The test is performed on the left and
right sides.
Classic
Instructions
• Get on your hands and knees over the 2x6 so your hands are under your
shoulders and your knees are under your hips.
• The thumbs, knees and toes must contact the sides of the 2x6, and the toes
must be pulled toward the shins.
• At the same time, reach your right hand forward and right leg backward, like
you are flying.
• Then without touching down, touch your right elbow to your right knee directly
over the 2x6.
• Return to the extended position.
• Return to the start position.
• Do you understand these instructions?
Scoring
3
Performs a correct unilateral repetition
2
Performs a correct diagonal repetition
1
Inability to perform a diagonal repetition
Self-Screen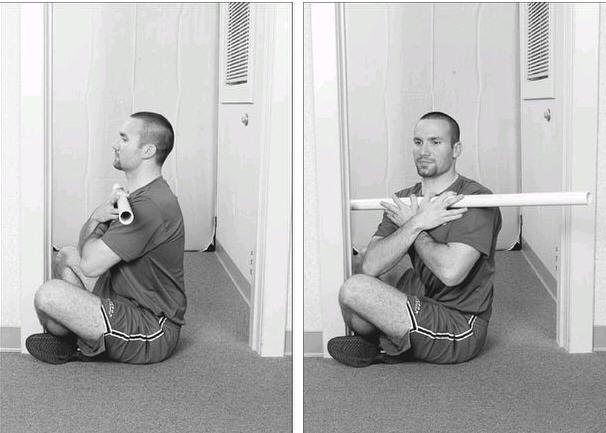
Sit upright on the floor, back straight, with legs crossed. One foot should be
on each side of the doorjamb. Hold the dowel above your chest in front of your
shoulders. It should touch your collarbone and the front of both shoulders at
all times.
Sit upright on the floor, back straight, with legs crossed. One foot should be
on each side of the doorjamb. Hold the dowel above your chest in front of your
shoulders. It should touch your collarbone and the front of both shoulders at
all times.